Snippets

Upgrading from Magento <=2.2.x to 2.3.x

At some point you’re going to want to upgrade your Magento project from 2.0/2.1/2.2 to the latest 2.3.x release to take advantage of new functionality and many improvements. There are a few manual changes that get in the way of the standard composer update that you’re used to. Thankfully, to accommodate this obstacle a tool was included in the codebase to automate these changes for you.

Prep:


# Create a fresh Magento 2.3 project via composer (or clone the repo and switch to a 2.3 tag/branch, or grab the script by itself..)
composer create-project --repository=https://repo.magento.com/ magento/project-community-edition=2.3 m23base

# Change working directories to the upgrade tools directory in your new project
cd m23base/dev/tools/UpgradeScripts

Execute:

# Run the 2.3 upgrade assistant against the root of the Magento project you’re intending to upgrade
php -f pre_composer_update.php — –root=/path/to/magento-installation –repo=https://repo.magento.com/


Output:
– Updated composer.json
– Updated update/composer.lock
– Updated update/dev/tests

Change working directories to the root of the Magento project you’ve begun updating and complete the remaining steps.


cd /path/to/magento-installation

# Update Magento and all dependencies
composer update

# Clear the cache
rm -rf /var/cache/*
rm -rf /var/page_cache/*

# Remove any generated code
rm -rf /var/generation
rm -rf /generated/code/*

# Run Magento upgrade scripts
php bin/magento setup:upgrade

# Reindex after upgrade
php bin/magento i:rei

# Flush cache after reindex
php bin/magento c:f

Reading:

Documentation:
– https://devdocs.magento.com/guides/v2.3/comp-mgr/cli/cli-upgrade.html#upgrade-cli-script
Debugging: Cannot add foreign key constraint

Backstory:

I was working late to get a feature “working” before heading off to sleep. Somewhere in between autocomplete and matching definitions to Magento core files I had prepped my setup script. But upon running php bin/magento setup:upgrade instead of being all set I was greeted with a foreign key constraint issue to debug.

Foreign Key Constraint Cannot Be Added Error Message

Foreign key constraint from the UpgradeSchema.php in question:
->addForeignKey(
$setup->getFkName(self::CUSTOMMODULE_STORE_PIVOT_NAME, 'store_id', 'store', 'store_id'),
'store_id',
$setup->getTable('store'),
'store_id',
\Magento\Framework\DB\Ddl\Table::ACTION_CASCADE
)

So I went back to UpgradeSchema.php to take a closer look at things. I compared what I’d written to vendor/magento/module-store/Setup/InstallSchema.php since that’s the table I was creating my constraint agaisnt and realized that I’d set store_id on my pivot table to TYPE_INTEGER where it should have been TYPE_SMALLINT.

->addColumn(
'store_id',
\Magento\Framework\DB\Ddl\Table::TYPE_SMALLINT, //<-- I assumed this was going to be an integer, oops.
null, ['unsigned' => true, 'nullable' => false, 'primary' => true],
'Store ID'
)

Simple mistake, simple fix. I updated the type definition, re-ran setup, and was back in business. But the output was not that helpful and I was curious how to get better information about what actually went wrong in the event it wasn’t as apparent. And after a quick search here we are, log in to mysql from CLI and check the INNODB Engine Status logs.

Debugging:

ERROR 1215 (HY000): Cannot add foreign key constraint

mysql -u whomever -p
mysql> SHOW ENGINE INNODB STATUS;

The piece of the log we’re interested in for this use case is the aptly named latest foreign key error section.

------------------------
LATEST FOREIGN KEY ERROR
------------------------
2018-05-08 21:57:58 0x700001222000 Error in foreign key constraint of table ...

...
//The table name and query are output here but not relevant as it was output when the error was thrown during setup:upgrade. See below for the real issue:
...

Cannot find an index in the referenced table where the
referenced columns appear as the first columns, or column types
in the table and the referenced table do not match for constraint.
Note that the internal storage type of ENUM and SET changed in
tables created with >= InnoDB-4.1.12, and such columns in old tables
cannot be referenced by such columns in new tables.
Please refer to http://dev.mysql.com/doc/refman/5.7/en/innodb-foreign-key-constraints.html for correct foreign key definition.

TLDR; double check your column definitions. Make sure the data type and attributes match where appropriate. For example: This DOES mean both ID columns should be unsigned but DOES NOT mean your pivot table’s ID column should be auto incrementing. Put this in your memory bank and hopefully you’ll find it useful while debugging at some point.

SO to a stackoverflow answer from 2013 for still being helpful – https://stackoverflow.com/questions/15534977/mysql-cannot-add-foreign-key-constraint

More articles/tips/tool for debugging here.

Webpack Dashboard + Laravel Mix

Adding webpack-dasboard to your Laravel project only takes a few steps whether you’re just getting started or trying to further optimize your application.  This tutorial assumes that you’ve at least gotten as far as setting up your project and installing all its dependencies.

Step 1: Add webpack-dashboard to your project as a dev dependency:

npm install webpack-dashboard --save-dev

Step 2: Next update the scripts section of your package.json by changing the following entry:

"hot": "cross-env NODE_ENV=development node_modules/webpack-dev-server/bin/webpack-dev-server.js --inline --hot --config=node_modules/laravel-mix/setup/webpack.config.js",

.. to something this (the color “`-c“` and title “`-t“` can be changed to whatever you’d like):

"hot": "webpack-dashboard -c blue -t 'Laravel Webpack Dashboard!' -- cross-env NODE_ENV=development node_modules/webpack-dev-server/bin/webpack-dev-server.js --inline --hot --progress --config=node_modules/laravel-mix/setup/webpack.config.js",

Alternatively if you need to use https with a local trusted cert:

"hot": "webpack-dashboard -c blue -t 'Laravel Webpack Dashboard!' -- cross-env NODE_ENV=development node_modules/webpack-dev-server/bin/webpack-dev-server.js --https --cert '/etc/apache2/ssl/server.crt' --key '/etc/apache2/ssl/server.key' --inline --hot --progress --config=node_modules/laravel-mix/setup/webpack.config.js",

Step 3:  Now update the Laravel Mix webpack configuration “`./webpack.mix.js“` to import the dashboard plugin, near the top, and then initialize it by adding to the configuration, located near the bottom of your file:

let DashboardPlugin = require('webpack-dashboard/plugin');
//...
mix.webpackConfig({
// ...
plugins: [
new DashboardPlugin(),
],
//...
});

Step 4:  Start up the webpack-dashboard and dev server by running:

npm run hot


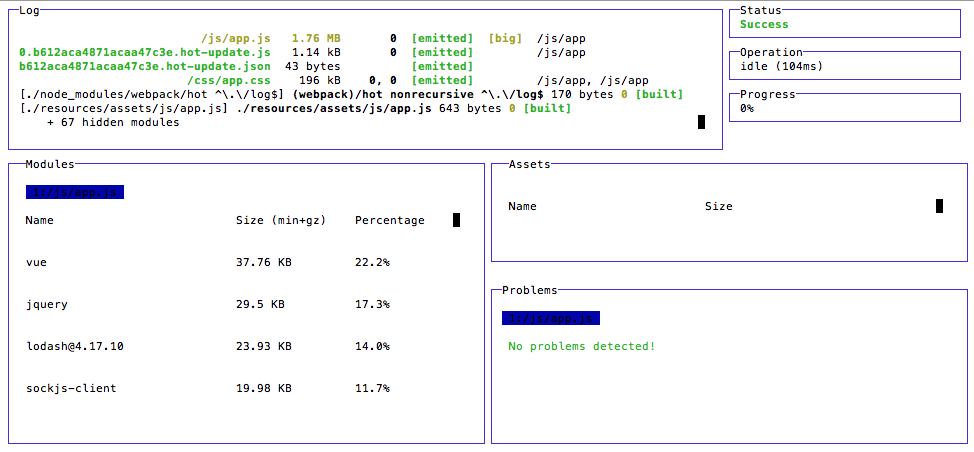
Your output should look similar to the following..

Webpack dashboard output for Laravel Mix

Now visit your site as normal and continue working in your assets directory!

Some caveats:

  • Hot reloading of SASS isn’t supported though you can mix(‘stylesheet’) and refresh as necessary.   Browsersync could be an alternative but likely wouldn’t play nicely with this hot reload setup.

More info here:

M2: Composer Bash Alias

At times you may need to quickly spin up a new, clean Magento 2 install. To simplify this process I added an alias for creating a new Magento 2 environment with composer. If you’re using Oh-My-Zsh as well then its as simple as nano ~/.zshrc and adding the following to the bottom of your configuration.


alias newm2="composer create-project --repository-url=https://repo.magento.com/ magento/project-community-edition ."

newm2 bash composer alias

Once you’re all set up you can run newm2 in any folder and this will automatically grab whatever the latest version is from Magento’s repo and create a new composer based env for you to continue testing/debugging/etc.

If you use any other shell this will still work but you’ll need to locate the proper configuration file for registering your alias (eg ~/.bashrc).

M2: OPCache GUI

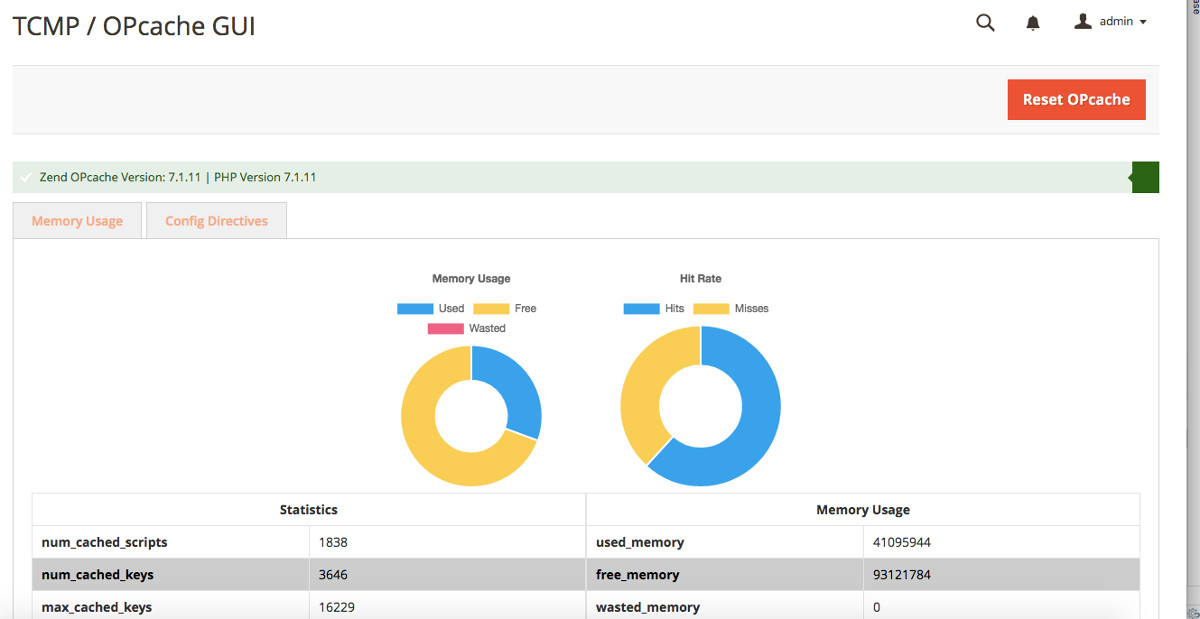
Now you can easily view the statistics for PHP OPcache in your Magento admin panel. TCMP OPcache GUI displays current memory usage / hit rate / configuration values. You can optionally enable the display of all cached scripts, including details about them, and a quick reset link for the menu (Stores > Configuration > TCMP Studio > OPcache).

Installation:


composer require tcmp/opcache
php bin/magento module:enable TCMP_OpCache
php bin/magento setup:updgrade
php bin/magento setup:static-content:deploy

Example:

TCMP OPcache GUI Example

More Information:

Supports: Magento 2.x (System Requirements) / PHP 7.x (OPCache Documentation)
The source: https://github.com/theycallmepepper/m2-opcache-gui
Packagist listing: https://packagist.org/packages/tcmp/opcache

Charts built with Chart.js
Version for Magento 1 (and inspiration for this version): https://github.com/SchumacherFM/Magento-OpCache/

M2: Marketplace EQP Code Standards + PHPStorm

What is MEQP?

Magento EQP Coding Standard is a set of rules and sniffs for PHP_CodeSniffer tool.

It allows automatically check your code against some of the common Magento and PHP coding issues, like:

– raw SQL queries;
– SQL queries inside a loop;
– direct class instantiation;
– unnecessary collection loading;
– excessive code complexity;
– use of dangerous functions;
– use of PHP superglobals;
– code style issues
– and many others.

Read more about it and see the source: Github: Magento Marketplace EQP

How do I use it?

This tool can be run via CLI against any extension by giving it the path but you can also more tightly integrate it into your development workflow with the following steps:


cd /path/to/your/docroot
mkdir meqp && cd meqp
git clone https://github.com/magento/marketplace-eqp.git .
composer install

Next open up PHPStorm and navigate to Preferences > Languages & Frameworks > PHP > Code Sniffer

You can set it to use the version of PHP_CodeSniffer installed with composer in the steps above. Just use “/path/to/your/docroot/meqp/vendor/bin/phpcs” as the path.

Next navigate to Preferences > Editor > Inspections > PHP > PHP Code Sniffer Validation

– Check “Show warnings as” and “Show Sniff Name”
– Choose MEQP2 from the down ( or MEQP1 for Magento 1.x code )
Originally posted as:
– Choose Coding Standard Custom
– Set your path tp the ruleset: “/path/to/your/docroot/meqp/MEQP2/ruleset.xml”

Thats it, now you can write your code according to Magento’s standards! You should see notifications right alongside your code indicating the issue and the sniff that is triggering it.


Updated for clarity and accuracy 3/25/2018.

M2: UI Component Form Field Validation

When building custom forms you’ll need to validate a few different types of data. Thankfully there are a number of validation rules already at your disposal in Magento’s core.


<!-- ... abbreviated usage example - vendor/module/view/adminhtml/ui_component/example_form.xml -->
<field name="title">
            <argument name="data" xsi:type="array">
                <item name="config" xsi:type="array">
                    <item name="dataType" xsi:type="string">text</item>
                    <item name="label" xsi:type="string" translate="true">Title</item>
                    <item name="formElement" xsi:type="string">input</item>
                    <item name="sortOrder" xsi:type="number">20</item>
                    <item name="dataScope" xsi:type="string">title</item>
                    <item name="validation" xsi:type="array">
                        <item name="required-entry" xsi:type="boolean">true</item>
                        <!-- ... additional rules go here -->
                    </item>
                </item>
            </argument>
        </field>
<!-- ... abbreviated usage example -->

A list of available rules from vendor/magento/module-ui/view/base/web/js/lib/validation/rules.js:

  • min_text_length
  • max_text_length
  • max-words
  • min-words
  • range-words
  • letters-with-basic-punc
  • alphanumeric
  • letters-only
  • no-whitespace
  • zip-range
  • vinUS //US VIN Numbers
  • dateITA
  • dateNL
  • time
  • time12h
  • phoneUS
  • phoneUK
  • mobileUK
  • stripped-min-length
  • email2
  • url2
  • credit-card-types
  • ipv4
  • ipv6
  • pattern //REGEX
  • validate-no-html-tags
  • validate-select
  • validate-no-empty
  • validate-alphanum-with-spaces
  • validate-data
  • validate-street
  • validate-phoneStrict
  • validate-phoneLax
  • validate-fax
  • validate-email
  • validate-emailSender
  • validate-password
  • validate-admin-password
  • validate-customer-password
  • validate-url
  • validate-clean-url
  • validate-xml-identifier
  • validate-ssn
  • validate-zip-us
  • validate-date-au
  • validate-currency-dollar
  • validate-not-negative-number
  • validate-zero-or-greater
  • validate-greater-than-zero
  • validate-css-length
  • validate-number
  • validate-integer
  • validate-number-range
  • validate-digits
  • validate-digits-range
  • validate-range
  • validate-alpha
  • validate-code
  • validate-alphanum
  • validate-date
  • validate-identifier
  • validate-zip-international
  • validate-state
  • less-than-equals-to
  • greater-than-equals-to
  • validate-emails
  • validate-cc-number
  • validate-cc-ukss
  • required-entry
  • checked
  • not-negative-amount
  • validate-per-page-value-list
  • validate-new-password
  • validate-item-quantity
  • equalTo
  • validate-file-type
  • validate-max-size
  • validate-if-tag-script-exist
  • date_range_min
  • date_range_max

PWA: Service Worker

An important piece of installing a service worker in your application is the ability to update it. Here a brief example of registering the service worker and then instructing it to check for an updated version.


if ('serviceWorker' in navigator) {
window.addEventListener('load', () => {
navigator.serviceWorker.register('/service-worker.js').then(registration => {
// Check for updates
registration.update();
console.log('SW registered and update called: ', registration);
}).catch(registrationError => {
console.log(registrationError);
});
});
}

Docs:
Service Worker Lifecycles – Manual Updates

Syncing Forks Without Merge Commits II: CLI


# Add an upstream remote for the repo that you just forked from
git remote add upstream https://github.com/ORIGINAL_OWNER/ORIGINAL_REPOSITORY.git

# Fetch the branch info
git fetch upstream

# Check out the local branch you'd like to sync up
# Set it to track against the local master so we can push/pull with shorthand
git checkout master --set-upstream=origin/master

# merge in the changes from the upstream repo
# at this point you should fast-forward and be in sync with the remote branch
git merge upstream/master

# push the local sync up to your repo
# since we set this to track origin/master already there is no need to specify
git push

Docs:
Configuring A Remote For A Fork
Syncing A Fork

Angular: Environment Variables

Add your variable and make sure that you configure each environment.


// ./public_html/src/environments/environment.ts or environment.prod.ts
export const environment = {
production: false,
apiUrl: 'https://example.apiurl.dev'
};

Then import the environment variables and use where necessary.


// ./public_html/src/app/example.ts
import {environment} from '../environments/environment';

export class Example {
public envOptions = {
apiUrl : environment.apiUrl
// ...
}
// ...
}