Upgrading from Magento <=2.2.x to 2.3.x

At some point you’re going to want to upgrade your Magento project from 2.0/2.1/2.2 to the latest 2.3.x release to take advantage of new functionality and many improvements. There are a few manual changes that get in the way of the standard composer update that you’re used to. Thankfully, to accommodate this obstacle a tool was included in the codebase to automate these changes for you.

Prep:


# Create a fresh Magento 2.3 project via composer (or clone the repo and switch to a 2.3 tag/branch, or grab the script by itself..)
composer create-project --repository=https://repo.magento.com/ magento/project-community-edition=2.3 m23base

# Change working directories to the upgrade tools directory in your new project
cd m23base/dev/tools/UpgradeScripts

Execute:

# Run the 2.3 upgrade assistant against the root of the Magento project you’re intending to upgrade
php -f pre_composer_update.php — –root=/path/to/magento-installation –repo=https://repo.magento.com/


Output:
– Updated composer.json
– Updated update/composer.lock
– Updated update/dev/tests

Change working directories to the root of the Magento project you’ve begun updating and complete the remaining steps.


cd /path/to/magento-installation

# Update Magento and all dependencies
composer update

# Clear the cache
rm -rf /var/cache/*
rm -rf /var/page_cache/*

# Remove any generated code
rm -rf /var/generation
rm -rf /generated/code/*

# Run Magento upgrade scripts
php bin/magento setup:upgrade

# Reindex after upgrade
php bin/magento i:rei

# Flush cache after reindex
php bin/magento c:f

Reading:

Documentation:
– https://devdocs.magento.com/guides/v2.3/comp-mgr/cli/cli-upgrade.html#upgrade-cli-script
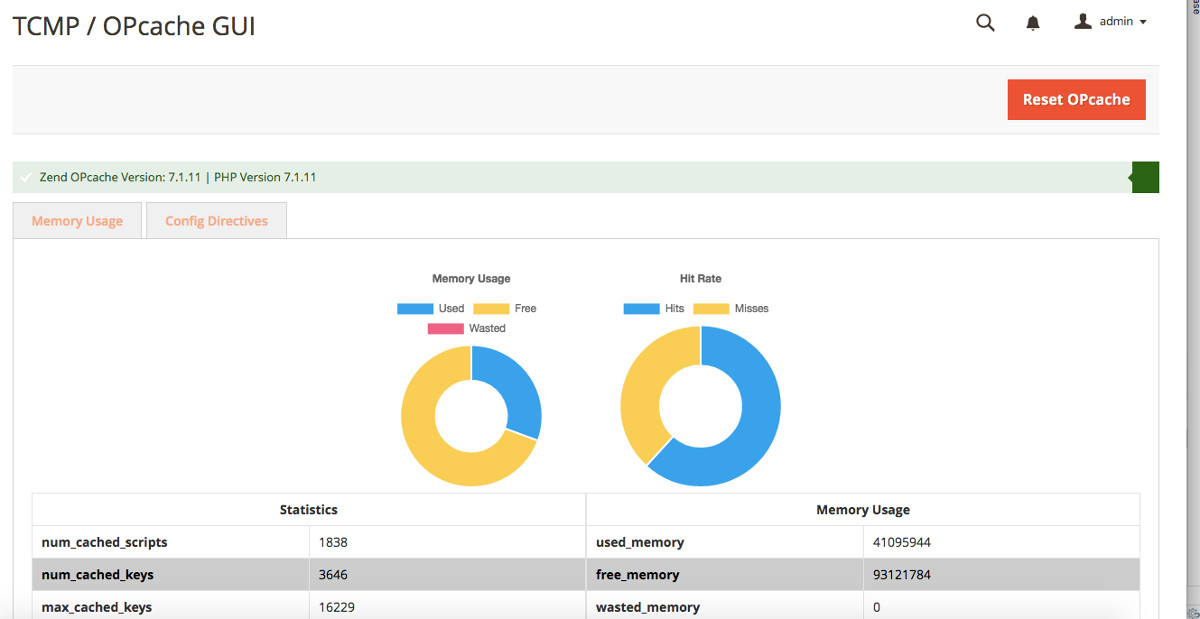
M2: OPCache GUI

Now you can easily view the statistics for PHP OPcache in your Magento admin panel. TCMP OPcache GUI displays current memory usage / hit rate / configuration values. You can optionally enable the display of all cached scripts, including details about them, and a quick reset link for the menu (Stores > Configuration > TCMP Studio > OPcache).

Installation:


composer require tcmp/opcache
php bin/magento module:enable TCMP_OpCache
php bin/magento setup:updgrade
php bin/magento setup:static-content:deploy

Example:

TCMP OPcache GUI Example

More Information:

Supports: Magento 2.x (System Requirements) / PHP 7.x (OPCache Documentation)
The source: https://github.com/theycallmepepper/m2-opcache-gui
Packagist listing: https://packagist.org/packages/tcmp/opcache

Charts built with Chart.js
Version for Magento 1 (and inspiration for this version): https://github.com/SchumacherFM/Magento-OpCache/

M2: Marketplace EQP Code Standards + PHPStorm

What is MEQP?

Magento EQP Coding Standard is a set of rules and sniffs for PHP_CodeSniffer tool.

It allows automatically check your code against some of the common Magento and PHP coding issues, like:

– raw SQL queries;
– SQL queries inside a loop;
– direct class instantiation;
– unnecessary collection loading;
– excessive code complexity;
– use of dangerous functions;
– use of PHP superglobals;
– code style issues
– and many others.

Read more about it and see the source: Github: Magento Marketplace EQP

How do I use it?

This tool can be run via CLI against any extension by giving it the path but you can also more tightly integrate it into your development workflow with the following steps:


cd /path/to/your/docroot
mkdir meqp && cd meqp
git clone https://github.com/magento/marketplace-eqp.git .
composer install

Next open up PHPStorm and navigate to Preferences > Languages & Frameworks > PHP > Code Sniffer

You can set it to use the version of PHP_CodeSniffer installed with composer in the steps above. Just use “/path/to/your/docroot/meqp/vendor/bin/phpcs” as the path.

Next navigate to Preferences > Editor > Inspections > PHP > PHP Code Sniffer Validation

– Check “Show warnings as” and “Show Sniff Name”
– Choose MEQP2 from the down ( or MEQP1 for Magento 1.x code )
Originally posted as:
– Choose Coding Standard Custom
– Set your path tp the ruleset: “/path/to/your/docroot/meqp/MEQP2/ruleset.xml”

Thats it, now you can write your code according to Magento’s standards! You should see notifications right alongside your code indicating the issue and the sniff that is triggering it.


Updated for clarity and accuracy 3/25/2018.

M2: UI Component Form Field Validation

When building custom forms you’ll need to validate a few different types of data. Thankfully there are a number of validation rules already at your disposal in Magento’s core.


<!-- ... abbreviated usage example - vendor/module/view/adminhtml/ui_component/example_form.xml -->
<field name="title">
            <argument name="data" xsi:type="array">
                <item name="config" xsi:type="array">
                    <item name="dataType" xsi:type="string">text</item>
                    <item name="label" xsi:type="string" translate="true">Title</item>
                    <item name="formElement" xsi:type="string">input</item>
                    <item name="sortOrder" xsi:type="number">20</item>
                    <item name="dataScope" xsi:type="string">title</item>
                    <item name="validation" xsi:type="array">
                        <item name="required-entry" xsi:type="boolean">true</item>
                        <!-- ... additional rules go here -->
                    </item>
                </item>
            </argument>
        </field>
<!-- ... abbreviated usage example -->

A list of available rules from vendor/magento/module-ui/view/base/web/js/lib/validation/rules.js:

  • min_text_length
  • max_text_length
  • max-words
  • min-words
  • range-words
  • letters-with-basic-punc
  • alphanumeric
  • letters-only
  • no-whitespace
  • zip-range
  • vinUS //US VIN Numbers
  • dateITA
  • dateNL
  • time
  • time12h
  • phoneUS
  • phoneUK
  • mobileUK
  • stripped-min-length
  • email2
  • url2
  • credit-card-types
  • ipv4
  • ipv6
  • pattern //REGEX
  • validate-no-html-tags
  • validate-select
  • validate-no-empty
  • validate-alphanum-with-spaces
  • validate-data
  • validate-street
  • validate-phoneStrict
  • validate-phoneLax
  • validate-fax
  • validate-email
  • validate-emailSender
  • validate-password
  • validate-admin-password
  • validate-customer-password
  • validate-url
  • validate-clean-url
  • validate-xml-identifier
  • validate-ssn
  • validate-zip-us
  • validate-date-au
  • validate-currency-dollar
  • validate-not-negative-number
  • validate-zero-or-greater
  • validate-greater-than-zero
  • validate-css-length
  • validate-number
  • validate-integer
  • validate-number-range
  • validate-digits
  • validate-digits-range
  • validate-range
  • validate-alpha
  • validate-code
  • validate-alphanum
  • validate-date
  • validate-identifier
  • validate-zip-international
  • validate-state
  • less-than-equals-to
  • greater-than-equals-to
  • validate-emails
  • validate-cc-number
  • validate-cc-ukss
  • required-entry
  • checked
  • not-negative-amount
  • validate-per-page-value-list
  • validate-new-password
  • validate-item-quantity
  • equalTo
  • validate-file-type
  • validate-max-size
  • validate-if-tag-script-exist
  • date_range_min
  • date_range_max

M2: Enabling REST API access to your module

If your module is correctly implementing interfaces and preferences for them in its di.xml then enabling web API access to your object’s repository should look something like the example shown below. You have the option of setting an ACL resource on any particular endpoint or making it publicly accessible for unauthenticated usage (maybe on the frontend of your site via AJAX?).

File Location: app/code/Vendor/Module/etc/webapi.xml
Reference: http://devdocs.magento.com/guides/v2.2/extension-dev-guide/service-contracts/service-to-web-service.html

    
        <?xml version="1.0"?>
        <routes xmlns:xsi="http://www.w3.org/2001/XMLSchema-instance"
                xsi:noNamespaceSchemaLocation="urn:magento:module:Magento_Webapi:etc/webapi.xsd">
            <!-- Example Service -->
            <route url="/V1/example" method="POST">
                <service class="TCMP\ExampleModule\Api\ExampleRepositoryInterface" method="save"/>
                <resources>
                    <resource ref="TCMP_ExampleModule::save"/>
                </resources>
            </route>
            <route url="/V1/example/:id" method="PUT">
                <service class="TCMP\ExampleModule\Api\ExampleRepositoryInterfacee" method="save"/>
                <resources>
                    <resource ref="TCMP_ExampleModule::save"/>
                </resources>
            </route>
            <route url="/V1/example/:id" method="DELETE">
                <service class="TCMP\ExampleModule\Api\ExampleRepositoryInterface" method="delete"/>
                <resources>
                    <resource ref="TCMP_ExampleModule::delete"/>
                </resources>
            </route>
            <route url="/V1/example" method="GET">
                <service class="TCMP\ExampleModule\Api\ExampleRepositoryInterface" method="getList"/>
                <resources>
                    <!-- allow public access to your api! -->
                    <resource ref="anonymous"/>
                </resources>
            </route>
            <route url="/V1/example/:id" method="GET">
                <service class="TCMP\ExampleModule\Api\ExampleRepositoryInterface" method="getById"/>
                <resources>
                    <!-- allow public access to your api! -->
                    <resource ref="anonymous"/>
                </resources>
            </route>
        </routes>
    

No syntax highlighting on this one. Not sure which part of this liked me trying to post XML the least…but that’s added to the backlog now! Thankfully < XMP > hasn’t been removed yet!

Reference: https://developer.mozilla.org/en-US/docs/Web/HTML/Element/xmp

M2: Delete Orders Extension

I released a little freebie this weekend, hope you enjoy. Feedback is welcome just open an issue or even better submit a pull request!

https://github.com/theycallmepepper/m2-deleteorders/

– Adds “Delete” to order actions in ACL
– Adds “Delete” to mass actions dropdown on Sales Order Grid
– Adds “Delete” to buttons on Sales Order View

M2: Debugging Playground continued..

After the last example of a bootstrapping Magento 2.x in a php file for some quick debugging I thought I’d clean things up a bit.

Below is the same basic example but more neatly packaged into a more useful class. Based on the *require* statement this should be placed relative to the index.php in your Magento root but that can easily be adjusted. This principle can be used for debugging or, if you’d like to get creative, to integrate your Magento installation directly with another application.

When the lass is instantiated the __construct method processes other methods that create a new instance of Magento, retrieve the object manager from it, and setup the application state (see _setAreaCode method notes). (read more below..)

//I should live in the root dir next to index.php
require __DIR__ . '/app/bootstrap.php';

/**
* Class Playground2
*/
class Playground2 {

/**
* @var \Magento\Framework\App\Bootstrap
*/
protected $bootstrap;

/**
* @var \Magento\Framework\App\State
*/
protected $state;

/**
* @var \Magento\Framework\App\ObjectManager
*/
protected $objManager;

/**
* Playground constructor.
*/
public function __construct()
{
$this->_loadBootstrap();
$this->_loadObjectManager();
$this->_loadAppState();
$this->_setAreaCode();
}

/**
* Bootstrap M2
*/
protected function _loadBootstrap()
{
$this->bootstrap = \Magento\Framework\App\Bootstrap::create( BP, $_SERVER );
}

/**
* Get the object manager so we can interact
* with classes and handle DI
*/
protected function _loadObjectManager()
{
$this->objManager = $this->bootstrap->getObjectManager();
}

/**
* Load the application state class
*/
protected function _loadAppState()
{
$this->state = $this->objManager->get( '\Magento\Framework\App\State' );
}

/**
* Set the proper area code
*
* AREA_GLOBAL
* AREA_FRONTEND
* AREA_ADMIN
* AREA_ADMINHTML
* AREA_DOC
* AREA_CRONTAB
* AREA_WEBAPI_REST
* AREA_WEBAPI_SOAP
*/
protected function _setAreaCode()
{
$this->state->setAreaCode( \Magento\Framework\App\Area::AREA_FRONTEND );
}

/**
* And an example debugging method
*/
public function echoCategoryName()
{
/** @var \Magento\Catalog\Model\Category $_categoryModel */
$_categoryModel = $this->objManager->get( 'Magento\Catalog\Model\Category' );

$_category = $_categoryModel->load( 1 );

echo $_category->getName();
}

}

$playground = new Playground2();

$playground->echoCategoryName();

Once we have a new instance of Magento’s object manager ready to go we can set up methods for whatever we need to debug. In this case we’ve used the object manager to load the root category and echo out its name with:


$playground->echoCategoryName();
.

If you wanted to retrofit this class a bit you could expose the object manager…

public function getObjectManager()
{
return $this->objManager();
}

… and then use this as an interface to load Magento (or extension) classes in your application. (or do more debugging without writing methods like the previous example, but we were cleaning things up, right?)

Posted here also: https://gist.github.com/theycallmepepper/8ee69bc84a14b5a6c787da650e045879

M2: Debugging Playground

While I’m sure we all agree that your code should live inside an extension, it can be still helpful to interact with something a little more directly or isolated from some other components when debugging. This is where the M1 style “playground script” comes in handy. Note that several things have changed including how models/helpers/etc are accessed, and how the application itself is bootstrapped or more specifically how the object manager is accessed.

//I should live in the root dir next to index.php
require __DIR__ . '/app/bootstrap.php';

//Load the application bootstrapper
$bootstrap = \Magento\Framework\App\Bootstrap::create( BP, $_SERVER );

//Then get the object manager so we can interact with classes and get valid DI
$obj = $bootstrap->getObjectManager();

//Set the application state
/** @var \Magento\Framework\App\State $appState */
$appState = $obj->get( 'Magento\Framework\App\State' );
$appState->setAreaCode( \Magento\Framework\App\Area::AREA_FRONTEND );

//Instead of setting a specific code lets use a constant
//A reference of what else is available:
//AREA_GLOBAL
//AREA_FRONTEND
//AREA_ADMIN
//AREA_ADMINHTML
//AREA_DOC
//AREA_CRONTAB
//AREA_WEBAPI_REST
//AREA_WEBAPI_SOAP

//Get the repository responsible for loading category models
//Just because we're not working in a proper extension
//Doesn't mean we shouldn't load things the right way...

/** @var \Magento\Catalog\Model\CategoryRepository $_categoryRepo */
$_categoryRepo = $obj->get( 'Magento\Catalog\Model\CategoryRepository' );

//See the previous post for a better example of using repos
//Though this particular repo works a little different
//as it only offers the following methods:
//->get('category_id','store_id');
//->save($category);
//->delete($category);
//->deleteByIdentifier('category_id');

//Load by category_id & store_id
$_category = $_categoryRepo->get( 1, 0 );

//Now we have our model...
echo $_category->getName();

M2: Invalidating Caches

When saving objects in your custom module it may be beneficial to indicate that a cache type should be cleared.  This can be achieved using the TypeListInterface from the Framework’s Cache Module. Furthermore with this interface you can also retrieve the cache type labels, a list of other caches that have been invalidated, or clean a cache type by code.

<?php

namespace Vendor\Module\Folder;

use Magento\Framework\App\Cache\TypeListInterface;

/**
 * Class Example
 *
 * @package Vendor\Module\Folder
 */
class Example {

   /**
   * @var TypeListInterface
   */
   protected $_cacheTypesList;

   /**
    * Example constructor.
    *
    * @param TypeListInterface $_cacheTypesList
    */
   public function __construct( TypeListInterface $_cacheTypesList )
   {
      $this->_cacheTypesList = $_cacheTypesList;
   }

   /**
    * Mark specific cache type(s) as invalidated
    *
    * @param $type
    */
   public function invalidateCache( $type )
   {
      $this->_cacheTypesList->invalidate( $type );
   }

   /**
    * Get information about all declared cache types
    *
    * @return array
    */
   public function getCacheTypes()
   {
      /* Example structure for cache type array
       $_types = [
         'CACHE TYPE CODE' =>
          (object)[ //Magento\Framework\DataObject
                    'id' =>(int)'',
                    'cache_type'=>(string) '',
                    'description'=>(string)'',
                    'tags'=>(string)'',
                     'status'=>(int)'',
             ]
      ];*/
      return $this->_cacheTypesList->getTypes();
   }

}

M2: Loading model collections the Magento 2.x way

It is now be the responsibility of the repository to load and persist models from the database rather than using the model to load and save directly. This can be confirmed by the load and save methods being marked as @deprecated in \Magento\Framework\Model\AbstractModel.


use Magento\Framework\Api\FilterBuilder;
use Magento\Framework\Api\SearchCriteriaBuilder;
use Magento\Framework\Api\Search\FilterGroupBuilder;
//your model repo, etc...
.......

$_searchCriteria = $this->_searchCriteriaBuilder->create();

$filterA = $this->_filterBuilder->setField( $fieldName ) //Filter by model field name
->setValue( $tagValue ) //Filter value
->setConditionType( 'eq' ) //Comparison operator
->create();

$filterGroupA = $this->_filterGroupBuilder->setFilters( [ $filterA ] )->create();

//Filters in the same groups work like OR
//Multiple filter groups work like AND
//Which is why the filter and the group are noted with as [$a]

$_searchCriteria->setFilterGroups( [ $filterGroupA ] );

/** @var Model[] $_results */
$_results = $this->_modelRepository->getList( $_searchCriteria )->getItems();

return $_results;